Steer into the Future! 🚜
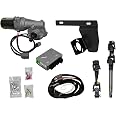
The SuperATVEZ-STEER Power Steering Kit is engineered for John Deere Gator models (2005+), ensuring a perfect fit with 100% guarantee. This kit significantly reduces steering effort and eliminates unwanted feedback, making your ride smoother and more enjoyable. Installation is a breeze with no soldering required, and the watertight control box ensures durability in all conditions.
| Manufacturer | SuperATV.com |
| Brand | SuperATV.com |
| Package Dimensions | 41.91 x 41.91 x 17.78 cm; 8.16 kg |
| Item model number | PS-JD-G-XUV |
| Manufacturer Part Number | PS-JD-G-XUV |
| Item Weight | 8.16 Kilograms |
C**Y
Challenging install
First, this kit works perfectly once installed - I bought a used, 2012 825i Gator w/o power steering and this is a cost-effective way to add that feature.The install... well, maybe I should start w/ the disassembly:1) getting the steering wheel off is a b!tch. I had googled the process and found threads where people build a flat steel "triangle" for the puller to grab onto. This is critical to this part of the process - especially on an 8 year old machine. Even then, i still had to whack the puller to get the steering wheel to come lose and it sprung lose under the pressure.2) apparently, i'm bad with geometry because getting the original steering shaft out took some trial-and-error. when it came out, it was like solving a puzzle - voila!install:1) first, the instructions aren't great. The pictures are sometimes taken too close to the machine to get a good sense of where things go. It just slowed the process down a bit.2) getting everything to line up and tighten up all of the mounting hardware would have been best accomplished by an octopus. Extra hands would have helped, but it's a pretty tight space to work in so you would have to be friendly with your helper.3) So, the effect of item #2 was that after I had everything tightened up, I couldn't get the u-joint that basically fits right IN the hole in the firewall to line up so it wouldn't rub. I'm not proud of it, but I had to shave off less than 1/4" inch notch on one side of the hole. I also had to trim the gasket that fits the hole.The good:1) the parts are made really well and feel like OEM2) the picture of all of the parts how they go together is useful3) the wiring instructions are well explained and the fittings on the control module are intuitive4) at the end, the PS is AWESOME! a huge improvement and worth the money.could be better:1) the power connector... this is a knock on every aftermarket producer. Everyone that owns a UTV adds accessories and all of the accessories connect to the same power connector - whether it's the always on or keyed power. It would SURE be nice if the harness had an extra "pigtail" to easily add the next accessory. In my case, I had to customize the wiring to the keyed power for the power steering kit and my winch.In the end, I'm pretty mechanically oriented and I knew what I was getting into and knew it would not be an easy install. I'm mostly giving this rating and feedback for the next person. Overall, I'm VERY happy with the product and would highly recommend it.
K**0
Brilliant addition to any side by side
I have installed two of these kits now and felt more detailed instructions would help other purchasers of this product. Makes the John Deere Gator a dream to drive all day.Supplemental Instructions for John Deere 855D Super-ATV EZ STEER Power Steering Install (refer also to instructions supplied with kit for instructions & pictures)1. If installed remove windscreen or open vent flap at bottom of screen depending on type.2.3. If installed remove two pins from front brush guard and fold foreword.4.5. Open bonnet and remove two retaining bolts. 13mm nut and bolt.6.7. Remove bonnet.8.9. Remove tool compartment from under bonnet. It just sits in place.10.11. Remove four bolts securing plastic grill. 10mm12.13. Remove plastic grill.14.15. Remove two bolts securing radiator retaining bracket. 10mm16.17. Do not remove radiator hoses. Lift radiator up and to the left. This will allow easier access to the steering rack & steering shaft.18.19. Remove steering shaft yoke bolt on the steering rack. (Fig.1 original instructions)20.21. Remove plastic steering wheel cover. Remove steering wheel retaining nut and washer. Apply penetrating lubricant, you should possibly do this step several days before install of this kit.22.23. Remove steering wheel using a suitable puller. A bearing separator works well on a plastic steering wheel like this, used in conjunction with a two leg puller.24.25. Disconnect all the switches from the dashboard (take note of the location of the various switches before removal). Removal can be done by pushing the switch out from behind the dashboard, unplugging it then re plug the switch to the wiring with the switch removed from the dashboard. This will prevent you wondering which plug belongs to which switch. Unscrew the nut retaining the ignition switch and remove.26.27. Remove dashboard (refer to original instructions steps 4 & 5)28.29. Remove top C-clip from top of steering shaft. IMPORTANT - slide C-clip under steering column down the steering shaft about 5cm (2”).30.31. Remove lower steering shaft yoke off steering rack. Apply penetrating lubricant to the yoke to aid removal. A flat bladed screwdriver can be tapped into the yoke to prize it open. The steering wheel can also be sat back on the steering shaft to allow you jiggle the shaft while using two pry bars to separate the steering yoke off the steering rack shaft. PATIENCE IS REQUIRED for this step.32.33. Remove original shaft.34.35. INSTALLATION OF KIT PARTS36.37. Remove all yoke bolts from lower shaft Q. Seperate lower shaft Q into two pieces by. Install lower shaft Q with the short shaft onto the steering rack shaft and insert the shaft through the firewall. Attach the upper part of shaft Q to short shaft inside the firewall. Install shaft bolts.38.39. Follow original instructions steps 6 to 12.40.41. Follow original instructions for step 13 (wiring is straight forward by following the pictures). Control box mounting Option A. Removal of the two bolts securing the existing relay module (upper left of picture, no need to unplug the wiring) will make installation of the control box easier. IMPORTANT- BE CAREFUL SECURING WITH THE M6 BOLTS, AS THE TAPPED THREAD IS EXTREMELY EASY TO STRIP. Then reinstall the two bolts of the existing relay module. A careful search should reveal the required stock connectors. Depending on the accessories attached to your machine the connectors may already be in use and a John Deere piggyback connector or the supplied quick splice connector will be needed.42.43. Secure all new loose wiring with cable ties.44.45. Tighten all hardware. Reinstall dash and switches.46.47. Replace radiator into its lower rubber bushes. Install radiator retaining bracket. IMPORTANT - MAKE SURE THE FAN WIRING IS CLEAR OF THE RADIATOR FAN.48.49. Reinstall grill with four bolts.50.51. Reinstall tool compartment.52.53. Reinstall bonnet with two bolts.54.55. If installed push brush guard back into position and secure with the two retaining pins.56.57. If installed replace windscreen.58.59. Reinstall steering wheel, but do not tighten retaining nut. Go for a short drive and when you are sure the wheels are straight, remove steering wheel apply copper or silver grease to the steering shaft spline. Adjust the wheel on the spline to straight and tighten the nut.60.61. Reinstall steering wheel cover.62.63. IMPORTANT - go enjoy using your Gator with power steering, it’s amazing.
M**S
Good product
Good
S**K
Fits up great and works great very happy
10/10
C**N
Maybe 5?
This power steering kit went into a recently acquired used 2010 JD XUV 850D Gator. Installation was accomplished by a 80+ year old semi skilled shade tree mechanic guiding an an 18 year old mechanically inclined but low experienced sharp young man who did 90% of the hands on work.The installation, including reading instructions took 6+ hours if running for tools is subtracted.Installation instructions are fair but the photos are not much help. My JD tech manual was more helpful for the removal phase than the installation. The included kit parts were complete except the stock bolt at the Steering Rack U joint did not fit the new part. That required a trip to Home Depot for a bolt that fit the kit part.A part of the new steering shaft rubbed against some existing electrical blocks mounted on the fire wall but that problem was solved by relocating the e bocks.Tools required are a set of metric box/combination wrenches; a 10" crescent wrench; flat screwdriver, phillips screwdriver, and I strongly suggest a steering wheel puller (claw type) and C clip pliers for removal of the steering wheel and two C clips on the existing upper steering shaft and installing the new upper shaft.Other than that, some youthful agility to access the harder to reach areas - which I lack - are essential.My reason for this installation was to reduce steering effort and reduce steering wheel kick back when traversing rough pasture terrain and allow low effort maneuvering requiring quick turns. This kit makes that possible with minimal steering effort.In summary, I am very pleased with the improvement I'd hoped for. If the system holds up, it well deserves five stars.
Trustpilot
1 week ago
1 day ago